How To Prep Your Home Exterior Before A Southwest Florida Paint Job
Fresh exterior paint can make a home look new again, but in Naples, Fort Myers, Cape Coral, Bonita Springs, and Estero, the climate doesn't forgive skipped prep. Sun, salt, humidity, and surprise rain can break paint adhesion fast.
The good news is simple: southwest florida paint prep is mostly about cleaning, drying, repairing, and priming the right spots. Do that well, and your finish has a real shot at lasting.
Below is a homeowner-friendly way to prep your exterior so your next paint job doesn't fail early.
Start with a walk-around, then plan for Florida weather
Before anyone washes a wall, take ten minutes and look at your home like a paint inspector. Bring a phone for photos and a notepad. You're hunting for causes of failure, not just ugly spots.
Pay attention to where water sits and where sun hits hardest. For example, north-facing walls often grow mildew, while south and west walls bake all day. Also check areas near sprinklers, pool decks, and lanai screens, since overspray and constant moisture can wreck paint.
Here are common Southwest Florida trouble spots worth checking closely:
- Stucco hairline cracks around windows, corners, and parapets
- Chalky paint that leaves a powder on your hand when you rub it
- Mildew or algae in shaded areas and under soffits
- Rust bleed on metal railings, fasteners, and metal doors
- Glossy trim (doors, fascia, shutters) where new paint can slide right off
Now look at the forecast. In February 2026, you'll still get humidity swings, dew, and the occasional rainy stretch. Humidity matters because surfaces can feel dry and still hold moisture in pores, especially stucco. If you paint too soon, you trap moisture and risk bubbling, peeling, and stains.
If your home was built before 1978, pause here. You might have lead-based paint on older trim or coatings.
If there's any chance of lead paint, use lead-safe practices and consider hiring EPA RRP-compliant help, especially for sanding and scraping.
If you want a contractor to handle the full prep and paint process, start by reviewing residential house painters Southwest Florida so expectations are clear from day one.
Wash for salt, mildew, and chalk, then let it dry longer than you think
In Southwest Florida, washing is not a quick rinse. It's a removal job. Salt film, mildew roots, and chalky residue all block adhesion. If you paint over them, you're bonding paint to contamination, not to the house.
Start by protecting what shouldn't get wet. Cover exterior outlets, cameras, doorbells, and lights. Move patio furniture away from walls. Pre-wet landscaping, then gently cover sensitive plants if you'll use cleaners. Also shut off irrigation near the work area, since overspray can keep stucco damp for days.
A pressure washer can help, but it can also carve stucco and drive water behind trim. Use the lowest pressure that still cleans. Keep the tip moving, and don't blast upward under laps, soffits, or around window trim.
Mildew needs more than soap. Use a cleaner designed to kill mildew and algae (product-agnostic), and follow label directions. Let it dwell long enough to work, then rinse thoroughly. If you skip the biocide step, you can end up painting over spores that come right back through the finish.
Salt is sneaky too, especially near the coast and on windy streets. A thorough rinse matters because salt can keep attracting moisture, which weakens paint over time.
Dry time is where many projects go wrong. After washing, give the exterior time to release moisture. In humid weather, stucco and wood can stay damp even when the surface looks fine.
As a rule, wait at least 24 to 48 hours after washing, longer for shaded walls, heavy stucco, or after rain. When in doubt, wait.
If you have a moisture meter, use it. If you don't, check early morning. If the wall still feels cool and damp after the sun comes up, it's not ready.
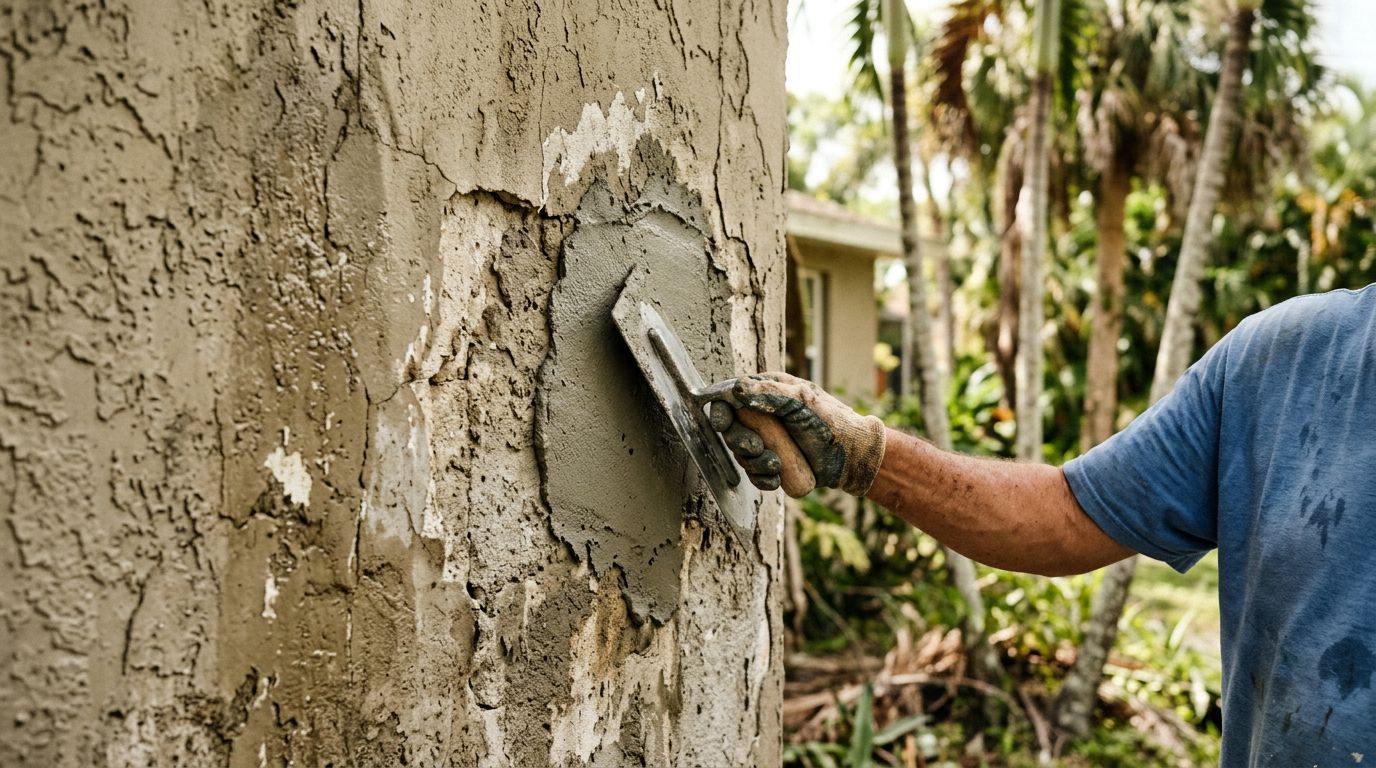
Fix cracks, treat rust, degloss trim, then prime the right areas
Once the exterior is clean and dry, prep turns into problem-solving. This is the stage that prevents paint from failing at seams and weak spots.
Stucco crack repair and caulking that actually lasts
Hairline stucco cracks are common here. The key is to repair them in a way that won't re-open. Patch materials need proper cure time before paint. If you rush it, you can trap moisture and create a visible "picture frame" around the repair later.
Caulk matters even more than most homeowners expect. Seal gaps at window frames, door frames, trim joints, and where different materials meet. Use a high-quality, paintable exterior sealant, and apply it to clean, dry surfaces. Tool it smooth so water sheds, not sits.
Rust treatment for metal that won't bleed through
If you see rust stains, remove loose rust first. Then clean the area well and apply a rust-inhibiting primer suited for the metal. Painting over rust without treatment is like putting a sticker on a leaking pipe. It might look fine for a month, then the stain returns.
Sanding and deglossing glossy trim
Glossy doors and trim can reject new paint. Scuff-sanding (or using a liquid deglosser where appropriate) gives the new coating something to grip. Feather rough paint edges so they don't telegraph through the finish. After sanding, remove dust completely, since dust acts like a bond breaker.
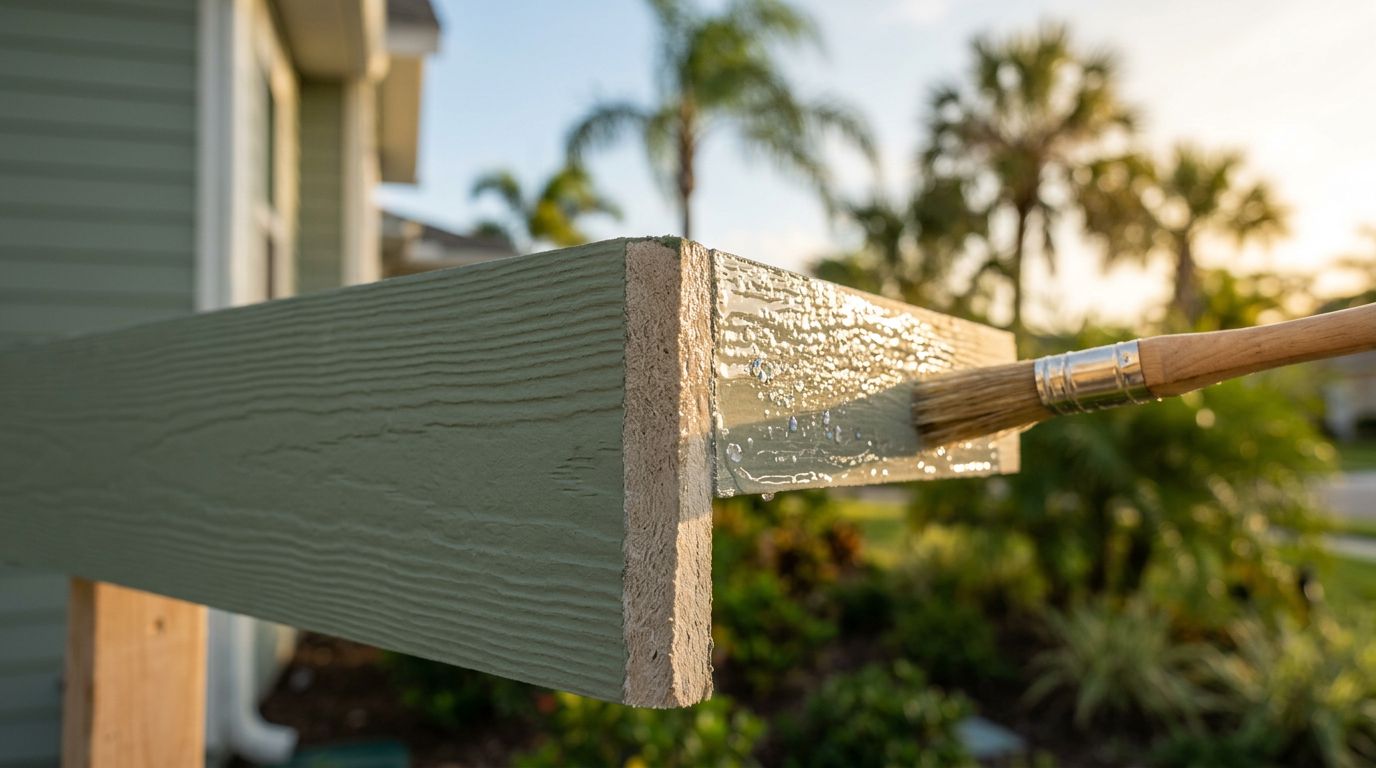
Priming rules (when you need it, and why)
Primer is not always "extra." In Southwest Florida, it's often the difference between paint that lasts and paint that peels.
Here's a quick guide to when priming is required:
| Surface condition | Prime? | Why it matters |
|---|---|---|
| Bare stucco, bare wood, bare metal | Yes | Seals pores and improves adhesion |
| Water stains or rust stains | Yes | Helps block bleed-through |
| Chalking that won't fully wash off | Yes | Binds the surface so topcoat sticks |
| New patches and repairs | Usually | Evens out porosity and sheen |
| Previously glossy trim (after scuffing) | Sometimes | Adds grip and uniformity |
Spot-priming is common, but full priming may be needed if the surface is uneven, chalky, or heavily repaired.
Protect your home, stay safe, and don't ignore HOA rules
Prep days are when most accidents and property damage happen. A smart setup prevents issues before the first coat goes on.
Wear eye protection and gloves when washing and scraping. Use a respirator when sanding, especially on older paint. Keep ladders on firm ground, maintain three points of contact, and never overreach. If power lines are nearby, treat them like they're closer than they look.
Also protect things that can't be replaced easily. Mask fixtures, door hardware, and delicate stone. Cover pool equipment and screens if you're sanding nearby, since dust travels. Move vehicles away from overspray zones, and warn neighbors if you share a tight lot line.
Finally, check your HOA and local requirements before you buy paint. Many communities require color approval, specific sheen levels, or even approved work hours. Some neighborhoods also require paperwork for contractors, parking, or equipment placement. Getting approval early keeps your project from stopping mid-prep.
If you're responsible for a condo building or a business exterior, the planning is similar but the logistics are bigger. In that case, hire SW FL commercial painting contractors who can coordinate access, safety, and scheduling.
Printable Southwest Florida paint prep checklist
Use this as a simple, print-friendly guide before your painter arrives (or before you start).
- Inspect walls for chalking, mildew, cracks, peeling, and rust
- Confirm HOA color approval and any community rules
- If home is pre-1978, treat paint as possible lead, plan for EPA RRP-safe work
- Protect outlets, lights, and cameras before washing
- Pre-wet plants and shield sensitive landscaping
- Wash to remove dirt and salt, then use a mildew-killing cleaner where needed
- Rinse thoroughly so residue doesn't affect adhesion
- Allow extended dry time (often 24 to 48 hours, longer in shade or high humidity)
- Patch stucco cracks and damaged areas, then allow full cure
- Caulk gaps at trim joints, windows, doors, and transitions
- Treat rusted metal (remove loose rust, clean, prime for rust control)
- Scuff-sand glossy trim and feather rough edges
- Remove sanding dust before priming or painting
- Prime bare surfaces, stained areas, chalky zones, and most repairs
- Set ladders safely, wear PPE, and keep walkways clear
A Southwest Florida exterior can look great for years, but only if the base is clean, dry, and sound. If you want the longest-lasting results, focus on prep first, paint second.
More featured articles...